Asset expert features
This article describes several expert features that can make your organization more skilled and efficient in managing Assets. Select the headers below for more information on how to use these features.
Explore Asset Preferences that control how the Asset module displays and behaves. These preferences can stop PM generation for out-of-service Assets, set rules for automatic Asset ID creation, and adjust the display for Asset nodes with many children Assets.
Suppress PM Generation for Out of Service Assets
This Preference determines whether or not PM Work Orders should generate for an Asset if it is marked as "out of service." When set to "Yes," Work Orders will not generate, and all scheduling information on the PM Asset will remain as last specified (last generated/completed dates or last meter readings). Once the Asset returns to service, any missed PM Work Orders will generate during the nightly automated PM generation process. Because of this, we recommend turning on Return Asset to Service Messaging, which warns of any PM schedules that may generate unwanted missed Work Orders for an Asset returning to service.
ID Builder for New Assets
There are two Preferences that configure how the system will assist in generating Assets ID's for newly created Assets. The first preference determines whether the Asset ID will be predefined for a new Asset, and the second determines how the system will number Assets of the same type (i.e. Classification).
If the "Use ID Builder" Preference is set to "No," no values will be populated into the new Asset's ID and Name fields. The user will be free to enter any value desired. If set to "Yes," the system will assist in generating an ID and Name to facilitate a consistent naming convention.
If the new record is a Location Asset, upon specifying the Classification, the Asset ID field will be populated with the Asset's Parent ID, followed by a dash prompting you to add more ID information, such as "PARKING," "CONF," and so on.
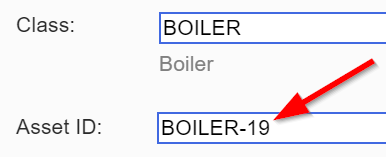
If the new record is an Equipment Asset, upon specifying the Classification, the Asset ID field will be populated with the Asset's Classification followed by a dash and the next number to assign.
The second Preference, the "Use Auto-Number" Preference, determines how the next number will be assigned. If this Preference is set to "Yes," the Asset ID field will indicate "Auto-Number" in brackets, as shown in the screenshot above. Once saved, the new Asset will be assigned the next available number for that Classification of Asset. If the Preference is set to "No," the next available number will automatically display in the Asset ID field during the creation process, as shown in the screenshot below. Once the record is saved, the Asset will retain this number:
The drawback to not turning on the Auto-Number Preference is that the next available number will increment during the Asset creation process, even if you end up canceling the creation of the record, thus creating gaps in your Asset numbering scheme.
Max Nodes to Read in Asset Tree Hierarchy
The Preference that determines the "Max Nodes to Read" is very helpful for organizations with a large number of Assets anywhere below the first level of the Asset tree. As users open nodes in the Asset tree, the system will present the results up to the specified number of records (default is 500). If the number of Assets within a node exceeds this, the system automatically switches to the Search tab display, and shows only the Assets within the selected node, as opposed to the full Asset tree.
The Search tab also adds the benefit of using pagination to more efficiently navigate records. In our example, there are over 500 Exit Light records, which have now been paginated for faster and easier navigation.
The Update Assets feature allows you to update Assets in bulk based on their Classification. The tool allows you to specify which fields or records should be updated for affected Assets, and it lets you configure the rules to determine how affected Assets should be modified. In addition to updating Assets to match the basic data defined for the Classification (such as the icon, photo, or model info), the tool can also be used to add Specifications or other secondary records (such as PM's, Parts, and Labor) to associated Assets.
Caution should always be exercised when using this feature as it performs a mass update to your data that cannot be undone.
The safest way to update Assets associated with an individual Classification is to open the desired Classification record, and click the Update Assets button on the footer bar.
The Asset Updater tool will open with this Classification already specified in the Classification field.
Alternatively, you can access the Asset Updater from the Tools menu (Tools>Asset>Asset Updater Using Classifications).
When accessed this way, it is very important to ensure that the proper Classification is specified in the first field before affecting any updates. This ensures that you do not alter ALL Assets with a Classification.
Next, it is important to specify if "All" locations should be updated, or only those under a particular node of the Asset tree. If only a particular node of the Asset tree should be updated, this should be selected from the Location dropdown control.
Once you have determined which Assets should be updated, the remaining controls are used to determine the data (i.e., fields and/or records associated with the Assets) that should be modified. The controls on the left are fairly straight forward, allowing you to update data that has been defined on the Classification Details, Meter or Risk tabs.
The controls on the right indicate which secondary records associated with the Classification should be updated. For each option, you can choose the type of update that should be performed. In the following example, we are merging Asset Specification records (adding missing Specifications and updating existing Specifications on the Assets), adding missing Labor records to the affected Assets, and synchronizing Asset Parts records (adding missing Parts, updating existing Parts, and deleting Parts not specified in the Classification record). No changes are being made to Asset PM's or Asset Documents.
The bottom of the Asset Updater dialog provides a legend ensuring you fully understand the impact of each action.
When you are confident that the correct parameters for the update have been defined, you can proceed by clicking Save. Upon completion, a message will display in the lower left of the dialog indicating that the Assets have been successfully updated:

The Asset Updater is a very powerful feature that is commonly used in the implementation process to more expediently populate Asset data. Common uses, in addition to updating photos and icons, include setting Assets of a particular Classification to use meters, adding Specifications and ranges to a set of Assets, and auto-populating Parts associated with a given Asset Classification. Although this feature is most commonly used in the early stages of implementation, customers find it very helpful for filling out Asset data at later stages of the process as well. For assistance is using this powerful feature, do not hesitate to reach out to our Customer Success team.
Set Asset Hierarchy Display Order
If you would like more control over the display order of Assets, you can use the Asset Hierarchy Display Order tool to reorder the display as desired. This tool is available from the Tools>Asset menu.
After opening the tool, the first level of your Asset Tree will display on the left in the Asset Hierarchy pane. When a node is selected, the children Assets of that node will display in the right pane.
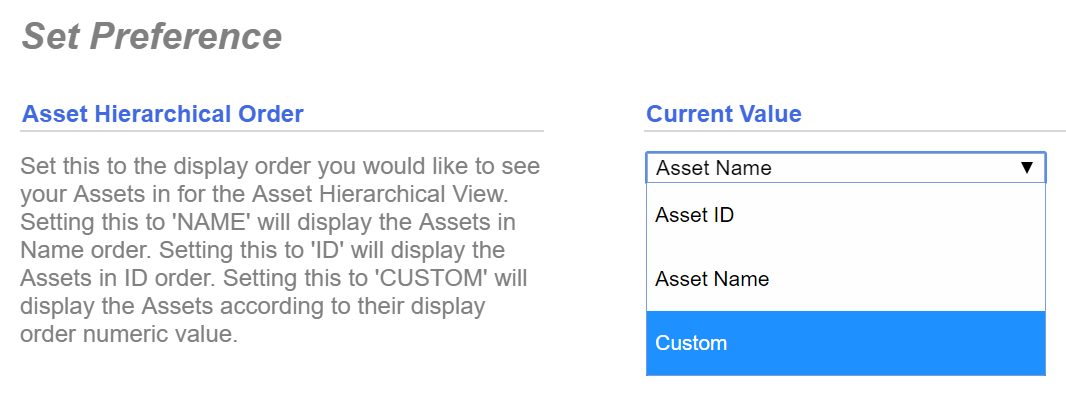
At the bottom left of the dialog is a control to set the default order. As shown below, the Asset Tree is currently set to display in alphabetical order by Asset Name:

Clicking the link will open the Preference to change this default. The preference can be set to Asset Name, Asset ID, or Custom. The Custom setting allows you to specify the order of display for individual Assets:
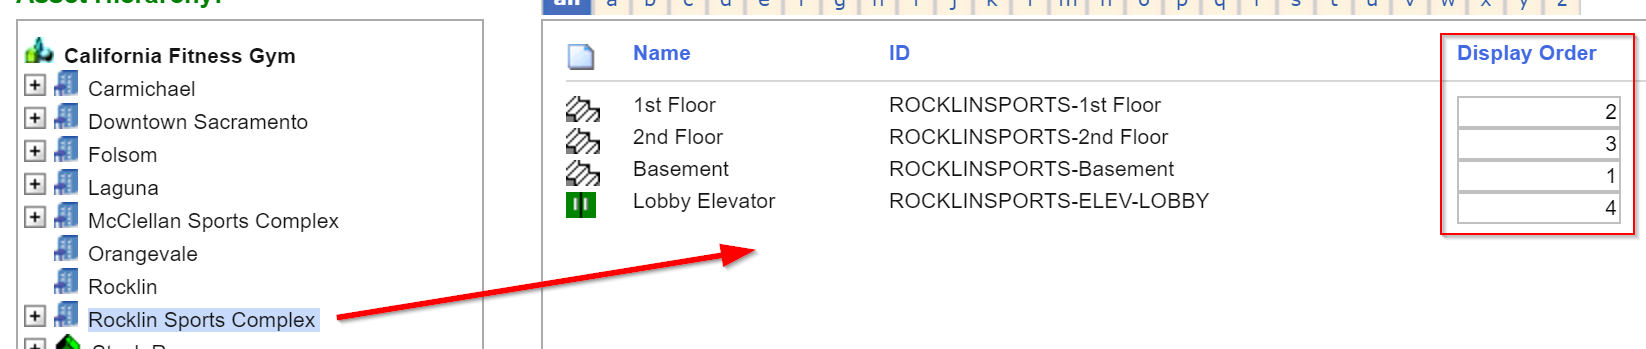
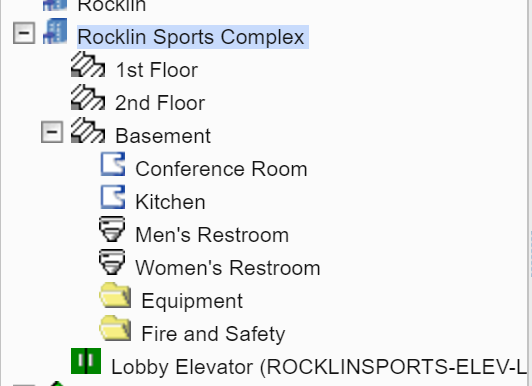
Let's say that you would prefer a custom order for the Rocklin Sports Complex that puts the floors in their actual order (Basement below 1st). We could set the display order by adding the proper numbers into the Display Order fields:
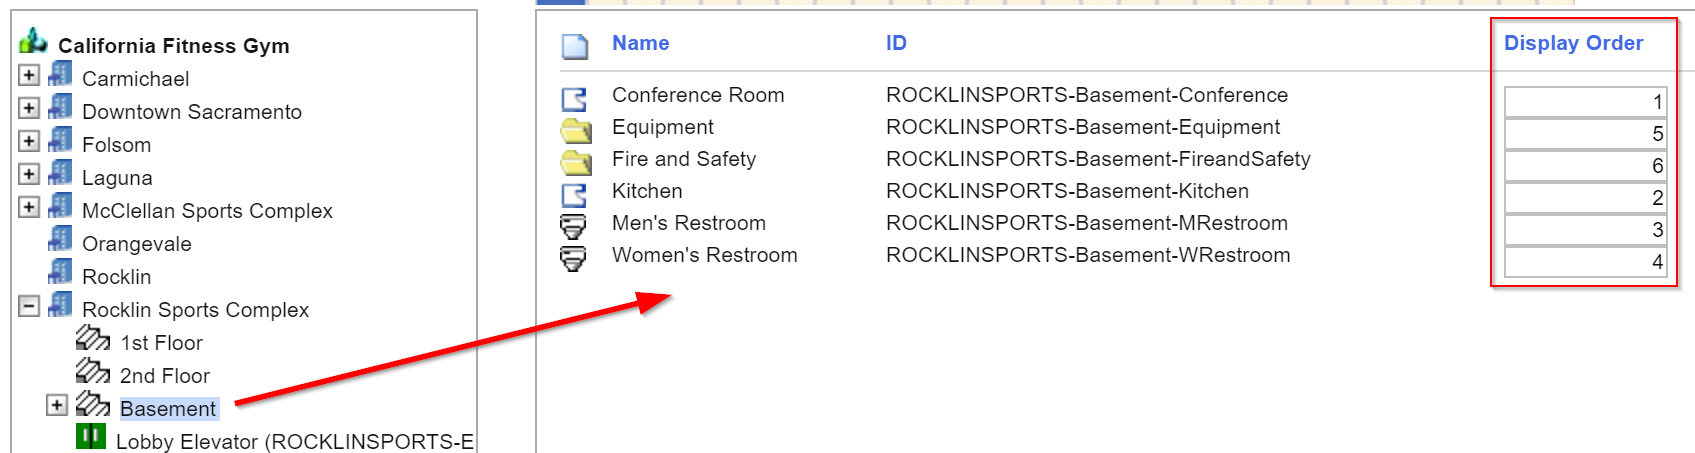
Similarly, the Basement children Assets can be set so that the rooms are displayed above the folders:
The resulting Asset Tree would appear as follows:
Nodes that are not given a specific order will show in Asset Name order by default.
By default, the Work Order module displays when you log into the system. We can change Preferences in order to make the Asset module display by default upon login. This configuration could be beneficial for systems that are primarily concerned with predictive maintenance of Assets, rather than having a Work Order-based approach.
Change this setting:
- Set the "Predictive Maintenance System?" Preference to Yes.
- Log off and log back into Maintenance Connection, and the Asset module will display by default.
This action affects the entire system, not just a single user, making the Assets module appear by default after every user logs in.
 Asset Preferences and Configuration: Suppress PM Generation, Auto ID Builder, and Max Records in Asset Tree